How Goals Work in ZooBlocks
Levels in ZooBlocks ask for two or three goals at once, drawn from seven goal types. Goals come in two flavors — accumulated-progress and single-shot milestones — and knowing which is which changes how you read the goal bar.
The Seven Goal Types
- Clear n rows / n columns — straightforward accumulated progress.
- Score n points — cumulative, added across every placement in the level.
- Pop n animals — accumulated pops of any color.
- Pop n {color}s — pops counted only in one animal color.
- Clear n lines at once — single-shot: one placement must produce n or more lines together.
- Pop n in one match — single-shot: one connected group must reach size n in a single pop.
The two single-shot goals are the spikes: they cannot be ground out slowly. If one appears, it deserves a concrete plan — usually leaving a line one cell short while building a same-animal cluster, then finishing both with one placement.
How Quotas Scale
Goal sizes grow with level difficulty (which caps at 60), so early levels teach and late levels grind:
- Row and column goals grow roughly one line per few levels, capped at the board size.
- Score goals start at board cells × 200 and add 1,500 per difficulty step, rounded to thousands.
- Pop-any goals start around 10 and grow about three pops per level.
- Color pop goals start around 5 and grow about 1.5 per level.
- Single-combo clears grow toward the board size itself.
- One-match pops grow slowly but are capped around 40% of the board.
Levels keep the same board type within a size tier and refresh the goal mix each level, so the same 8×8 board can ask for a color run one level and a no-line-priority score grind the next.
The Goal Pool Grows With You
Row and column goals are always available. Score goals join from level 3, pop-any goals from level 4, single-shot line clears and color pops from level 6, and one-match pops from level 10. Two goals per level is the common mix; from level 15, every fifth level carries three.
Daily Challenges Use the Same Logic
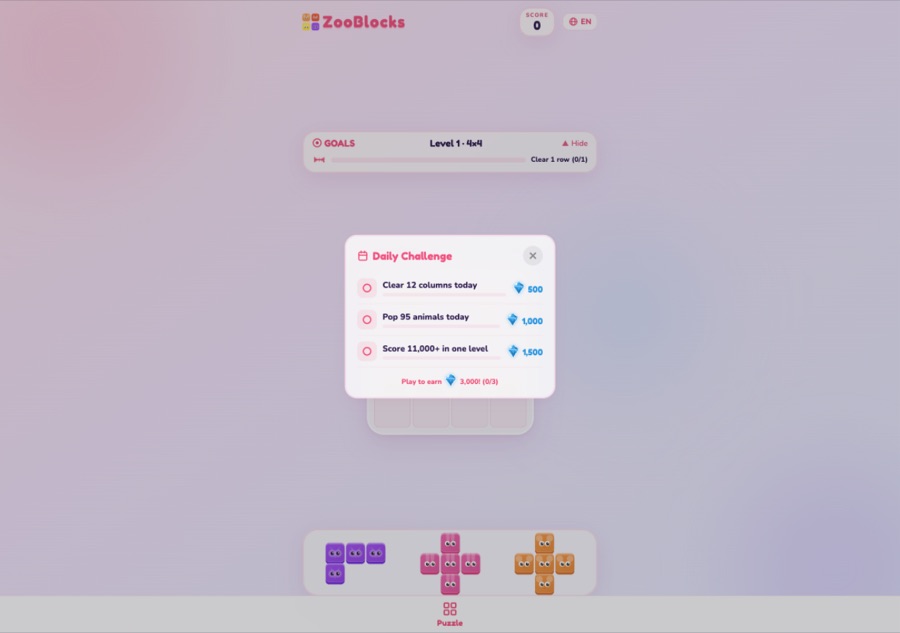
Once the zoo is active, a daily panel adds three quests, reset every day at local midnight. Daily quests draw from six templates, and finishing all three banks the combined diamond reward; a streak counter remembers consecutive claimed days.
- Score {n}+ in one level
- Clear {n} rows today
- Clear {n} columns today
- Get {n} combos today
- Clear {n} levels today
- Pop {n} animals today
Rewards scale with your zoo: each quest pays a base of your zoo income per second × 1,000 ÷ 6, with a 500-diamond floor for new players, split across the three quests. So daily play matters early for the floor reward and matters late because the income scaling keeps pace with the economy.
How to Read a Goal Pair
Read goals left to right as a mini-puzzle: cumulative goals are "background noise" that fill themselves during normal play, while spike goals need a turn purpose-built for them. When two spike goals appear together, look for one placement that satisfies both — a huge single-combo clear that also pops a big group is exactly the shape the generator is teasing you to find.
Reading a Real Level-20 Goal Set
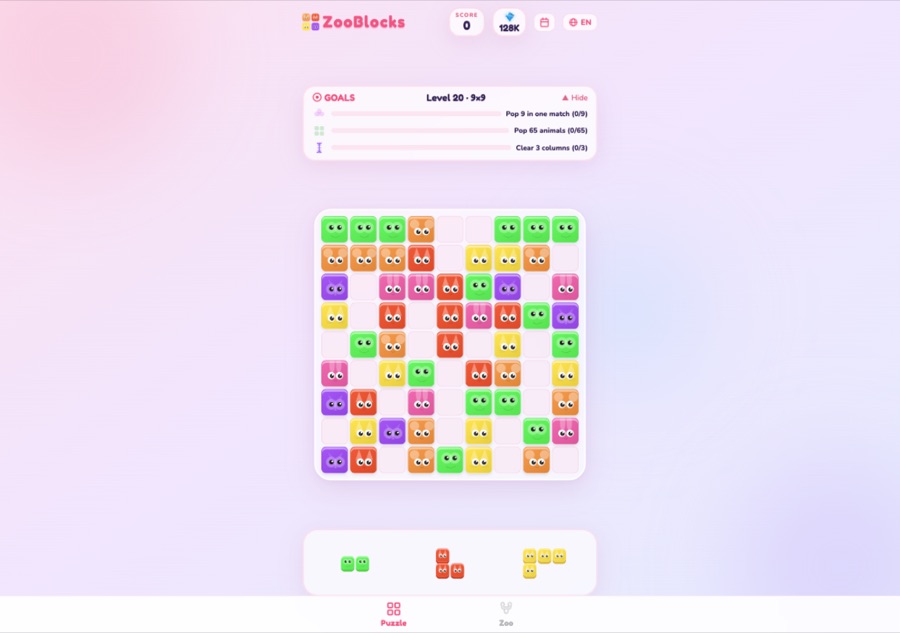
Take the three goals from the level 20 board shown above: Pop 9 in one match, Pop 65 animals, and Clear 3 columns. Read them in order of difficulty: the 65-any-pops fill themselves across the level; three column clears happen with basic line play; the 9-pop is the spike. The efficient plan: build one dense four-color cluster early, keep the columns filling around it, and resolve the spike on the same placement that banks your third column — one turn, two goals.
That pattern — spotted early, solved with one placement — is what the goal system rewards. When the goal bar shows a spike goal, spend the first turns building toward it intently instead of treating all three equally.
Goal Bar Mechanics
- Each goal has its own progress row with icon, current count, and target; completed goals get a green check with full progress bar.
- The bar can be collapsed with the Hide button while playing — useful on larger boards where clear space is the priority.
- Progress is per-level: retrying the same level number presents the same goals (they are generated from the level number), giving you a real chance to learn a tricky mix.
- The level ends as soon as every goal completes — no need to place remaining pieces.
Ready to Play?
Everything you read here is already live in the game — your browser is the only thing you need.